If you’ve ever noticed water bubbles forming on your ceiling, you know how worrisome it can be. Not only do these unsightly bubbles detract from the aesthetic appeal of your home, but they also indicate a potential water damage issue. In this blog post, we’ll delve into what causes these bubbles to form, whether or not you should pop them, and most importantly, how to fix them. So let’s get started and find out how you can restore your ceiling to its former glory!
How to Fix Water Bubble on Ceiling
Step 1: Assess the Situation
So, you’ve got yourself a lovely water bubble on your ceiling, huh? Well, first things first, take a moment to assess the situation. Is the bubble big or small? Is it leaking water? Is it about to burst like the final showdown in an action movie? Knowing what you’re dealing with will help you tackle it like a pro.
Step 2: Grab Your Safety Gear
Before you dive into action, make sure you’ve got the necessary safety gear on hand. Trust me, you don’t want to end up with a wet head and a bruised ego. Put on some goggles and a pair of rubber gloves. Safety first, my friend!
Step 3: Release the Pressure
Now, let’s get down to business. Grab a small pin or a needle and carefully puncture the bubble. Start with a tiny hole and gradually increase the size if needed. This will release the trapped air and prevent the bubble from growing bigger. Just be gentle with that needle, we don’t want any unnecessary ceiling casualties.
Step 4: Drip, Drip, Drip
To catch any remaining water that may be lurking inside the bubble, place a bucket or a bowl directly underneath it. Think of it as a water bubble treasure hunt. You never know how much water you might find!
Step 5: Dry it Out
Once you’ve dealt with the water situation, it’s time to dry out that bubble. Grab a fan or a hairdryer and point it towards the affected area. Let the breeze work its magic and evaporate any lingering moisture. You might want to sit back and relax during this step – drying a water bubble is a slow and steady process.
Step 6: Patch It Up
Now that your ceiling is dry again, it’s time to patch up the hole you made. Grab some spackle or putty and fill in the punctured area. Smooth it out with a putty knife, and voila! Your ceiling will be as good as new, and no one will ever know about that little adventure you had.
Step 7: Prevention is Key
To avoid future water bubble troubles, it’s essential to address the underlying issue. Check for any leaks in the roof or plumbing and fix them promptly. A proactive attitude is your best friend when it comes to maintaining a bubble-free ceiling.
And there you have it, my friend – a guide to fixing water bubbles on your ceiling. Remember, approach the task with confidence and a sprinkle of humor. Now go grab that needle, and let’s burst some bubbles!
Small Water Bubbles on Ceiling
The Mysterious Small Water Bubbles
Ever noticed those tiny, pesky water bubbles popping up on your ceiling out of nowhere? It’s like they have a secret agenda to ruin your beautifully painted surface. Don’t worry, you’re not alone in this battle. Let’s dive into the world of these mischievous moisture-filled spheres and learn how to fix them.
The Culprits Behind Miniature Water Bubbles
Humidity, the Sneaky Saboteur
Humidity can be a relentless saboteur, lurking in the corners of your home. It creeps in when you least expect it, causing condensation and eventually leading to those irritating bubbles on your ceiling. Combat this sneaky enemy by ensuring proper ventilation and using dehumidifiers to reduce excess moisture in your living space.
Leaky Pipe Pranks
Another notorious culprit is the hidden leprechaun of plumbing, a leaky pipe. These little imps can cause water to seep into your ceiling, resulting in the unsightly bubbles that you’re dealing with. Inspect your plumbing system regularly and fix any leaks promptly to keep these mischievous bubbles at bay.
Bursting the Bubble Trouble Techniques
Pop Goes the Bubble
When you spot those tiny water-filled anomalies, your first instinct may be to pop them. Don’t worry, we won’t judge you for it. Gently puncture the bubble with a pin or needle to release the trapped water, and then carefully flatten it back down. Just be cautious not to damage the surrounding area.
Dry and Patch
Once all the bubbles have been released from their watery prisons, it’s time to dry and patch up the affected area. Grab a dry cloth or sponge and soak up any remaining moisture. Then, use a recommended paintable patching compound to repair any damage caused by the bubbles. Follow the instructions on the packaging and smooth it over the affected area. Voila! Your ceiling will be as good as new.
Preventive Measures for Future Bubble Trouble
Paint Like a Pro
Using a high-quality, water-resistant primer and paint is your secret weapon against those troublesome bubbles. Apply a couple of coats to create a protective barrier, preventing moisture from seeping through to your ceiling. Let’s give those bubbles something to think about before they decide to show up uninvited!
Ventilation Vacation
Improving the ventilation in your home is essential to keep humidity at bay. Consider installing exhaust fans in high-moisture areas like the kitchen and bathroom. These little helpers will evacuate the steam and maintain a dry and bubble-free atmosphere in your dwelling.
Bid Farewell to Mini Water Bubbles
You’re now equipped with the knowledge and techniques to banish those small water bubbles from your ceiling. Remember to stay vigilant and address any leaks or humidity issues promptly. With a touch of humor and a can-do attitude, you’ll successfully keep your ceiling bubble-free. Good luck and happy bubblin’ fixing!
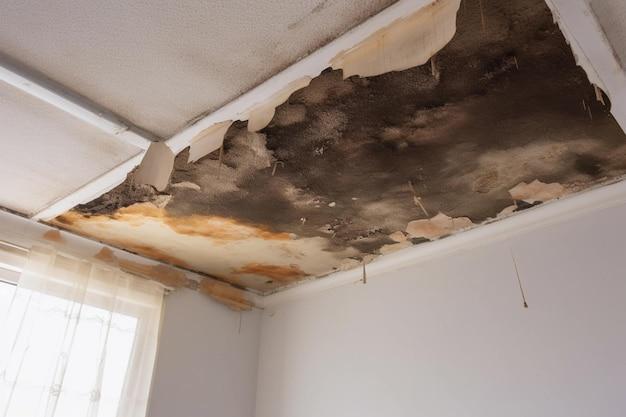
What Causes Bubbling on Ceiling
If you’re staring up at your ceiling and noticing that it has a lovely bubbly texture, congratulations! You’ve won the lottery of surprise home repairs. But before you start blaring “My Heart Will Go On” to set the mood, let’s figure out what’s causing this little bubble bath on your ceiling.
Moisture, The Mischievous Culprit
Ah, moisture, the sneaky little troublemaker that never fails to wreak havoc on our homes. It turns out that an excess of moisture is often the main culprit behind those unsightly bubbles on your ceiling. Moisture can seep into the ceiling material and cause it to swell, resulting in the dreaded bubble effect.
Roof Leaks, the Uninvited Rainfall
One common cause of excess moisture is a leaky roof. It’s like your ceiling decided to take up skydiving without your permission. When rainwater finds its way into your home through a leaky roof, it can accumulate in the ceiling, causing the materials to become waterlogged and start bubbling.
Plumbing Issues: The Secret Infiltrator
Another possible cause of ceiling bubbles is a plumbing issue. It’s like your home’s waterworks system is staging a rebellion against you. If there’s a leaky pipe or water supply line hidden within the ceiling, it can slowly release water and create those pesky bubbles as it seeps into the ceiling materials.
Condensation: The Cold Shoulder
Condensation, the meteorological equivalent of a cool handshake, can also lead to ceiling bubbles. When warm, moist air comes into contact with a cool ceiling surface, it can condense and cause droplets to form. Over time, this constant moisture exposure can lead to the appearance of bubbles.
DIY Disasters: The Hapless Handyman
Sometimes, the cause of ceiling bubbles can be traced back to our own bumbling DIY adventures. If an overly enthusiastic painter didn’t properly prepare the surface or used low-quality paint, it can create a barrier that traps moisture within the ceiling, resulting in those unwelcome bubbles.
So there you have it, a delightful journey through the land of ceiling bubbles and their mischievous causes. Now that you’re armed with this knowledge, you can go forth and conquer those bubbles with confidence. May the force be with you, and may your ceiling be as bubble-free as a freshly opened can of soda.
Should I Pop the Water Bubble in My Wall
So you’ve noticed a water bubble on your ceiling and now you’re wondering if you should pop it. Well, let’s dive into this bubbly situation and dissect it with a touch of humor, shall we?
The Curiosity of Bubbles
Bubbles, oh how they captivate our attention! They can be mesmerizing, even when they’re not floating their way into our homes. But when a water bubble appears on your wall, it’s natural to want to burst it like a bubble wrap.
Pop or Not: The Dilemma
Ah, the dilemma of whether to pop that water bubble or let it be. Picture yourself as a bubble breaker extraordinaire skilled in the art of remedying this watery situation. But hold on, my friend, let’s not rush into this.
The Consequences of Popping
Like a bubble that bursts, popping that wall bubble might bring unexpected consequences. You see, that bubble could be holding back a more substantial problem like a leaking pipe or something equally sinister. So it’s important to proceed with caution!
A Professional’s Perspective
If you’re uncertain about your bubble-popping abilities or if you’re dealing with a more complex issue, it’s wise to seek the assistance of a professional. They have the knowledge and expertise to accurately assess the situation and provide appropriate guidance.
In the Meantime: Monitor and Manage
While the urge to pop that bubble might be enticing, it’s best to exercise restraint. Instead, monitor the bubble’s growth, take pictures for documentation purposes (yes, you can be the bubble paparazzi), and make a note of any changes in size or shape.
Wrap-Up: Let It Be or Seek Help
In conclusion, when it comes to the water bubble on your wall, it’s a good idea to resist the temptation to pop it without fully understanding the underlying cause. If you lack the know-how or suspect a more significant issue, consult a professional who can appropriately address the situation.
Remember, my fellow bubble enthusiasts, sometimes it’s best to let the bubbles be and let the professionals handle the popping. Stay bubbly, folks!
Note to readers: The blogger does not take responsibility for any bubble-related mishaps. Bubble popping should only be attempted by responsible individuals trained in bubble-popping safety procedures.
Can Water-Damaged Ceilings Be Fixed
So, you’ve got a water bubble on your ceiling? Yikes! Well, before you panic and start imagining your ceiling collapsing onto your brand-new sofa, take a deep breath. We’re here to talk about fixing water-damaged ceilings, and trust me, it’s not as daunting as it sounds. Let’s dive right in!
Assess the Damage
Before anything else, you’ll need to assess the extent of the damage. Is it just a small water bubble or a full-on ceiling waterfall? Knowing what you’re dealing with will help you determine the best course of action. Plus, it gives you an opportunity to dramatically scream, “Houston, we have a problem!”
Locate the Source
Next, you’ll need to locate the source of the water. Is it a leaking pipe, a rowdy upstairs neighbor, or perhaps your ceiling just wants to play a prank on you? Investigate the surroundings and play detective to solve the mystery. Don’t forget to wear your Sherlock Holmes hat!
Fix It Yourself or Call a Pro
Ah, the age-old question. Should you channel your inner Bob the Builder and fix the ceiling yourself, or should you call in the pros? Well, if you’re a DIY enthusiast with a tool belt and a can-do attitude, go ahead and give it a shot. But if you’re more like me, who has trouble hanging a picture frame straight, it might be wise to leave it to the professionals. No shame in that!
Dry It Out
Once the source is fixed, it’s time to dry out the water damage. Grab some fans, open the windows, and crank up your favorite tunes. Not only will this help dry the area faster, but it’ll also double as a dance party to lighten the mood. Maybe your ceiling bubble just wanted an excuse to boogie down!
Patch It Up
After everything is nice and dry, it’s time to patch up that damaged ceiling. Whether it’s a minor crack or a larger hole, you’ll need some spackle, sandpaper, and a touch of patience. Get your arts and crafts skills ready, because you’re about to become the Picasso of ceiling repairs!
Paint to Perfection
Last but not least, give your repaired ceiling a fresh coat of paint. Choose a color that not only matches the rest of your room but also reflects the newfound bravery you’ve gained from conquering this water bubble situation. Remember, a fresh coat of paint can work wonders for both ceilings and self-confidence!
Now that you’re armed with the knowledge to tackle a water-damaged ceiling, go forth and fix with confidence. And hey, if all else fails, at least you’ll have a great story to tell at your next dinner party. Cheers to fixing those ceiling bubbles like a pro!
Who Ya Gonna Call for That Water Bubble in Your Ceiling
1. DIY Detective:
So, you’ve found yourself face-to-face with an unexpected water bubble on your ceiling. Before resorting to supernatural explanations or busting out the Ghostbusters gear, it’s worth trying a little investigation of your own. While I can’t guarantee a thrilling sleuthing adventure, your first step should be figuring out the source of the trouble. Is it a leaky pipe? A rogue ice cube from your upstairs neighbor? Or perhaps a mischievous water balloon trapped up there? Get your detective hat on and start searching for clues!
2. Plumber Prodigy:
If your amateur detective skills don’t quite cut it, it might be time to call in the professionals. Cue the plumber prodigy, a hero armed with wrenches, pipes, and an uncanny ability to track down and fix water-related mysteries. These magicians of the plumbing world are trained to handle situations like water bubbles on ceilings with ease. With their expertise, they’ll identify the root of the problem, whether it’s a leaky pipe, faulty shower, or just a poltergeist playing tricks—okay, maybe not the last one—and work their magic to make it right.
3. Rooftop Rescuer:
Sometimes, water bubbles on your ceiling are not due to internal plumbing woes but external forces. Enter the rooftop rescuer, equipped with ladders, safety gear, and the skills to conquer heights. These experts are trained to tackle all things related to roofs, gutters, and downspouts. If the culprit behind your water bubble is a leaky roof or a clogged gutter causing water to seep into your home, the rooftop rescuer is your go-to. They’ll brave the heights and fierce winds to restore your ceiling to its bubble-free glory.
4. Ceiling Savior:
When all else fails, and your water bubble persists like a relentless superhero villain, it’s time to call on the ceiling savior. These masters of drywall repair and restoration can rid you of your bubble troubles once and for all. Armed with spackle, sandpaper, and a flair for precision, they’ll patch up the damaged area to make it pristine again. Say goodbye to unsightly bubbles and hello to a smooth, flawless ceiling. The ceiling savior will restore order to your home, ensuring no evidence of the watery mishap remains.
Conclusion:
When it comes to water bubbles on your ceiling, no job is too big or too mysterious. From the DIY detective to the ceiling savior, there’s a hero for every situation. So, before you panic or start Googling “ghostbusters for water bubbles,” remember to take a deep breath and call in the experts. They’ll have your ceiling looking as good as new, and you can go back to enjoying your home without any supernatural surprises.
Now that you know who to call, it’s time to fix that water bubble on your ceiling once and for all!
Should I pop a ceiling water bubble
To Pop or Not to Pop, That is the Question!
So, you’ve noticed a delightful little water bubble has formed on your ceiling. It’s like a tiny polka dot in an otherwise boring white expanse. But before you grab a pin and go all bubble-popping maniac, let’s take a moment to weigh the pros and cons.
The Temptation to Pop
Ah, the satisfying sound of a popping bubble! It’s a simple pleasure that can bring joy to even the grumpiest of souls. But when it comes to ceiling water bubbles, popping might not be the best idea.
A Watery Surprise
Picture this: You’re standing under that water bubble, pin in hand, ready to strike. You release the sharp point, and pop! A fountain of water showers down upon you, creating a lovely indoor rainforest. Okay, maybe not so lovely.
The Consequences of Popping
Besides the impromptu indoor rainforest, there are a few other downsides to popping a ceiling water bubble. First and foremost, you risk damaging the ceiling even further. That bubble is holding back a whole lot of water, and once it’s popped, there’s no turning back.
Get Ready for a Cleanup
Not only will you have a soggy mess on your hands, but you’ll also likely need to deal with water damage and potential mold growth. Trust me, dealing with mold is about as fun as watching paint dry. Well, at least there’s drying involved in both scenarios.
A Temporary Solution
Now, if you’re the impatient type (cough cough like me), you might be tempted to relieve your ceiling of that unsightly bubble. But hold your horses! Popping the bubble won’t fix the underlying issue causing the water buildup in the first place. It’s like putting a band-aid on a broken leg – it might make you feel better momentarily, but it won’t solve the problem.
Call in the Professionals
Instead of popping that bubble and potentially making matters worse, your best bet is to call a professional. They’ve got the knowledge and experience to identify and fix the root cause of the water problem. Plus, they’ll save you from having to perform any acrobatic ceiling inspections yourself. Trust me, nobody looks good with their head stuck in the ceiling.
When it comes to ceiling water bubbles, popping might provide temporary satisfaction, but it won’t fix the underlying issue. Call in the professionals, sit back, and let them work their magic. Just be sure to keep an umbrella handy in the meantime!
How to Fix Bubbling Drywall on Ceiling
So you’ve discovered some unsightly bubbling on your ceiling, huh? Don’t worry, you’re not alone! Many homeowners find themselves dealing with this annoyance at some point. But fear not, my fellow ceiling warrior, for I am here to guide you through the treacherous waters of bubble fixing with a touch of humor and a splash of knowledge. Let’s dive right in!
Assess the Damage: A Bubble’s Worst Nightmare
Before you can start patching up that bubbled drywall, you need to take a good, hard look at the damage. Is it just a small blister-like bubble or a full-blown bubble party? Identifying the size and severity of the bubble will help determine the best course of action. Plus, it gives you an opportunity to come up with some hilarious bubble puns to lighten the mood!
Pop It Like It’s Hot: Dealing with Small Bubbles
If you’re dealing with a small bubble, you can take matters into your own hands and do some bubble popping. Get yourself a utility knife or a pointy object (but be careful not to accidentally stab the ceiling, nobody wants that). Gently poke a small hole in the center of the bubble and watch it deflate like a sad balloon. But remember, safety comes first, always wear safety goggles and protect yourself from falling debris!
Patching Up the Damage: Battling the Big Bubbles
Now, if you’re facing a massive bubble invasion, it’s time to call in reinforcements. You’ll need to cut out the damaged section of drywall and replace it with a new piece. Start by marking the perimeter of the damaged area with a pencil, then use a drywall saw (or any saw with a fine-toothed blade) to carefully remove the old, bubbled drywall. Once that’s done, measure and cut a new piece of drywall to fit the hole snugly. Secure it with drywall screws, tape the seams, and apply joint compound (mud) like a pro. Sand, prime, and paint, and voila! Your ceiling will look brand spankin’ new!
Prevention is Key: Avoiding Future Bubbles
As the saying goes, prevention is better than bubble intervention. To avoid future bubbles, make sure your home is well-ventilated to prevent excess moisture buildup. Check for leaky pipes or roofs that may be causing water damage. And most importantly, keep an eye out for any bubble wannabes and address them before they get too cozy on your ceiling.
In conclusion, fixing bubbling drywall on your ceiling may seem like a daunting task, but armed with the right knowledge and a sprinkle of humor, you can conquer those bubbles like a champ. Remember, safety first, take it one step at a time, and soon you’ll have a bubble-free ceiling that would make even Michelangelo jealous!
What to Do If You Have a Water Bubble in Your Ceiling
Start with a Deep Breath
Finding a water bubble on your ceiling can be quite alarming, but fear not! We’ve got you covered. Take a deep breath and let’s tackle this issue together.
Step 1: Assess the Situation (aka Panic Mode: Off)
Before you dive into action, it’s important to assess the seriousness of the situation. Is the water bubble small and contained, or is it resembling a hot air balloon ready for takeoff? This will determine the urgency of your response.
Step 2: Grab Your Detective Hat
Time to put on your detective hat and find the source of the leak. The culprits can range from a leaky roof to a burst pipe, so channel your inner Sherlock and start investigating. Look for any wet spots, dripping pipes, or suspicious stains that might lead you to the cause.
Step 3: Call in the Experts (aka the Water Bubble Whisperers)
Now, we’re not suggesting you summon a team of paranormal investigators, but calling a professional is a wise move. They have the skills, knowledge, and fancy tools to detect the source of the leak and fix it properly. Plus, it’s nice to have someone else handle the heavy lifting while you sip a cup of tea.
Step 4: Contain the Bubble
While you wait for the experts to arrive, it’s essential to contain the water bubble to prevent any further damage. Grab a bucket or a sturdy container and position it right below the bubble. This way, you’ll collect the dripping water and avoid any impromptu indoor rain showers.
Step 5: No Touchy-Touchy
Resist the temptation to poke or prod the water bubble, even though it might look like a giant, tempting zit. Trust us, it won’t end well. Bursting the bubble might lead to a sudden downpour and an even larger repair bill. So, for the sake of your ceiling’s dignity, hands off!
Step 6: Bye-Bye, Water Stains
Once the leak has been fixed and the water bubble has disappeared into thin air (just like a magician’s trick), you might notice an unsightly reminder – water stains. Fear not, there’s a simple fix. Mix equal parts water and vinegar, grab a sponge, and gently dab the stain. With a bit of elbow grease and a positive attitude, those stains will vanish in no time.
Step 7: Prevention is King
Now that you’ve successfully dealt with a water bubble invasion, it’s time to prevent future flares. Regularly check your roof, plumbing, and any potential trouble spots to catch leaks before they turn into bubbles. Remember, an ounce of prevention is worth a pound of drywall repair.
Dealing with a water bubble on your ceiling can be a daunting task. However, by staying calm, calling in professionals, and following the steps we’ve laid out, you’ll be well-equipped to tackle this issue head-on. Just remember, in the fight against water bubbles, you’re the superhero of your ceiling. Don’t forget to wear your cape!